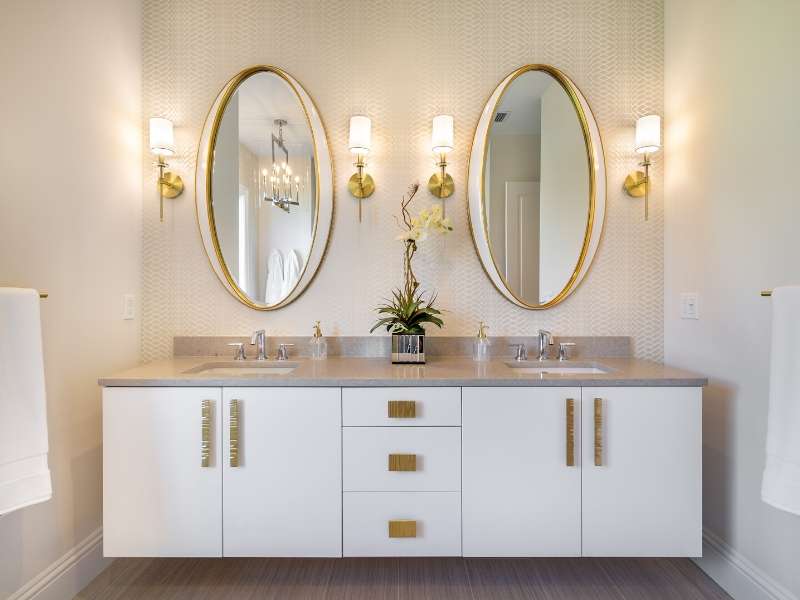
Lighting a bathroom needs to have great consideration. This is a room where you do multiple tasks and it is important that you have the ability to see well while performing them. Hotel bathrooms are notorious for bad lighting. I’ll never forget being at the W Hotel in Ft. Lauderdale for an event, trying to put my makeup on without vanity lighting, it was impossible to get it right!
You do not want to go through that frustration in your own home every single day. So many times, I see bathrooms designed with either overhead lighting alone or with one vanity light fixture above the sink on the wall. It is important to have overhead lighting combined with cross lighting, to fully cover the face and avoid shadows.
Here are tips and quick formulas to help you achieve perfect lighting over your vanity.
How to Light a Vanity Correctly
Lighting the Vanity from Above
The placement of the overhead lighting is very important in determining where the light is going to hit the face. The illustration below gives a good example of how to figure how many fixtures you will need and their placement. Place the recessed fixture 1/2 the distance of the depth of the vanity, from the wall.
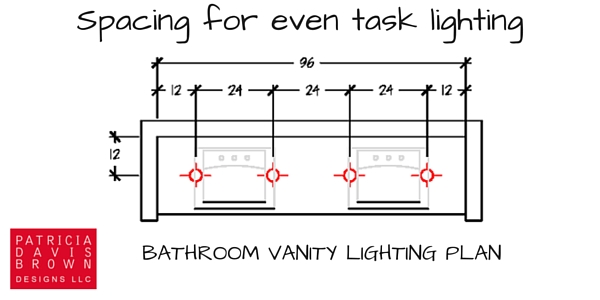
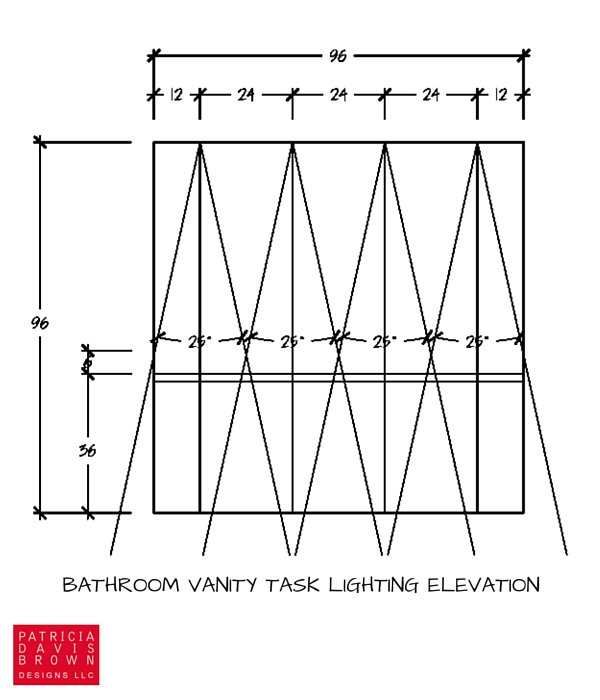
You want to have equal distance off the center of the sink. This will give even illumination to both sides of the face. Using one overhead fixture will create more shadows and uneven lighting on the face and make it harder to see. For example, you can quickly assess there will be four recessed fixtures at ceiling with a double bowl vanity 96-inches in length. In order to have even lighting across the vanity top, you would need to make sure the beam spreads are evenly placed. Each lamp has a beam spread and the middle of the lamp would be the nadir. The first can off the wall will be centered on 1/2 the beam (nadir), then multiply that number by 2 for the placement of each one after. So, the formula to figuring the center of each can would be as follow:
96″ divided by 8 = 12″ off the wall would be the center of your first recessed can. 12″ x 2 = 24″ would be the centerline of the 2nd, 3rd, and 4th.
Cross Lighting With Sconces
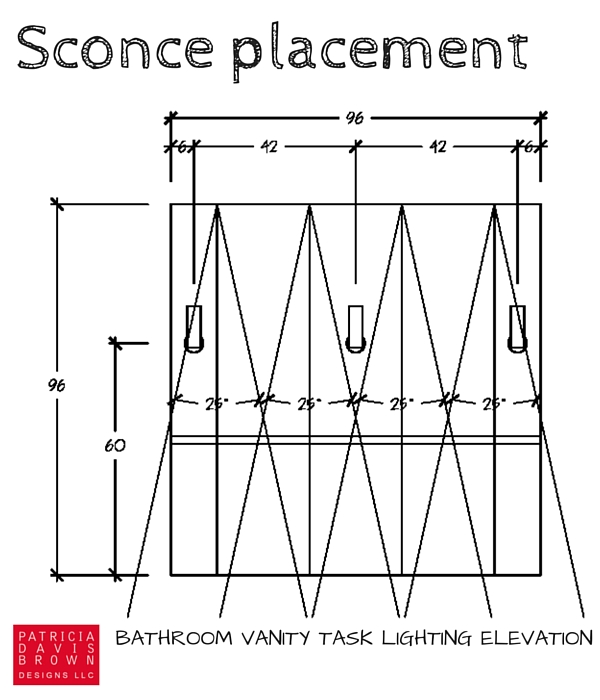
Cross lighting is necessary to fill in any shadows made by the down lighting. Sconces are a great choice for this and they add a decorative flair to the design. The height off of finished floor will be determined by the height of the person; subtract 4 inches from your height to determine eye level. The placement in this scenario would be half the distance between the placement of the first recessed can (6″), you would repeat that at the other end. The 3rd sconce would be placed right in the middle. So, what you are doing is adding lighting in between each cone of light except in front of the sink for the obvious reason.
You do not want to use a flood lamp for your recessed cans. You want a tighter light beam with a higher output of light because you will be performing tasks such as shaving or applying makeup here. Your flood lamps will be used in your general lighting around the bathroom with a lower light output, just enough to navigate the space.
Choosing the Optimal Light Color
Now that LED lamps are so popular, it must be said that the color of the lamp is very important. Make sure that the LED lamp you use has a Kelvin temperature of around 2700K to 3000K so that your bathroom finishes and skin tone stay true. Don’t bother considering names like “soft white” and “daylight”, they don’t mean anything because those color temperatures often vary amongst manufacturers. Numbers, on the other hand, don’t lie; look for the Kelvin temperature of your bulbs while shopping. The color rendering index, or CRI, may also be something to consider. CRI is a scale of 0-100 which rates the lamp’s ability to show the true color of objects. LED’s have vastly improved their CRI over the years, they can be found rated between 80-90 CRI, the closer to 100 the better. I also recommend putting all of your switches on dimmers so you have control of the light levels that are comfortable to you and the different members of the family that share a bathroom. Everyone’s comfort level varies, so design with flexible functionality in mind.
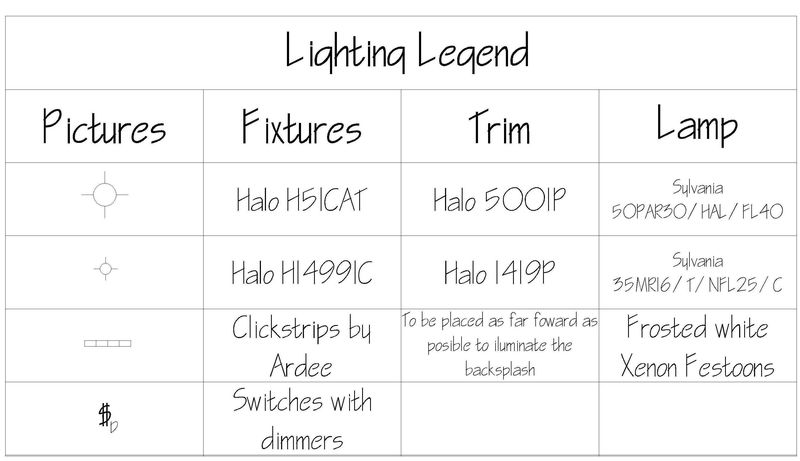
Lighting Plan Symbols
Unfortunately for many homeowners, lighting design is not a topic that is extensively thought about during the design phase of their remodel. When it comes time to approve plans, lighting for rooms are shown with lighting symbols almost arbitrarily placed in the center of rooms or the common grid with never enough lights. These easy plans made to fit most usually fit no one. Along with calculated placement of fixtures, a true lighting plan will also specify the parts to be installed. This is a very important component to a well thought out lighting design because factors such as the beamspread and light output all work together with the placement of the lamps to bring you a perfectly lit room. For more on lighting design plan, placements, and light specifications, especially those concerning with LED, read my post A True Lighting Design Plan & LED Technology.
I’m glad you’ve sought out information about proper lighting for your design project. You may also find these posts on bathroom design helpful.
- Maybe you don’t need a whole bath remodel, 3 tweaks for a new look
- 4 ideas for a bathroom facelift
- Bathroom design trends for 2015
- Neutral bathrooms can still make a statement
I understand how stressful an interior design project can be. You may need someone to guide you, help to explain all those choices, and point you in the right direction. I’m available for consultation via Skype for your interior design project, no matter the size. Our virtual session will include a document detailing everything discussed. Feel free to contact me prior to setting up a consultation.
Images Courtesy of Patricia Davis Brown Designs, LLC.
Daylighting; The Value and Benefits for Your Home
Bathroom Lighting Replacement; What You Need to Know


