A family’s dream home may have a great design and a high-quality wall and floor finishes. But, outside areas might need improvements with the installation of pavers. The patio, swimming pool area, front sidewalk, driveway, and garden paths finish better with pavers.
If this is something that interests you, we invite you to continue reading to learn more about pavers and how they help your property look refreshing.
10 Steps to Hiring the Best Paver Possible
Why Use Pavers for Your Exterior?
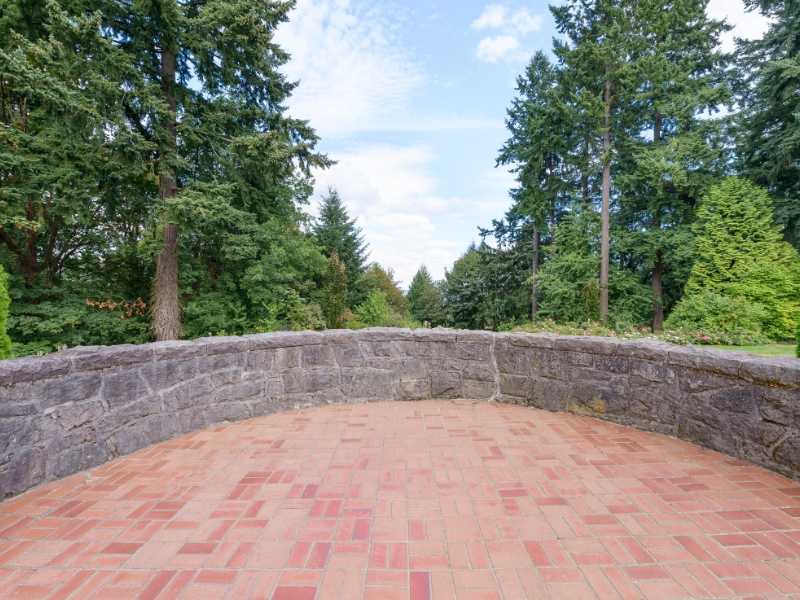
Pavers add beauty and value to home landscaping because they are versatile and attractive. In fact, pavers turn an area into a patio or an outdoor kitchen by providing flooring that is flat, even, and durable.
They even provide an even, flat pathway to different parts of the yard and to or from the house. They are also great to cover a driveway, outline garden spaces or be used to build a strong, effective retaining wall. They are also great to cover a driveway, outline garden spaces, or be used to build a strong, effective retaining wall, such as one made from 50mpa concrete sleepers.
Add curb appeal by extending your outdoor living space and improving the flow your walkways or revive a swimming pool deck. All this and more is possible with pavers. However, the proper installation essential in to add value and beauty to your landscape.
Choosing the Right Paver Contractor
When a homeowner wants the best value for their investment, it is important to hire the best paver installer. Begin by searching for installers at panterapavers.com. Also, visit online sites that rate and list contractors. Some tips for picking the best contractor include:
1. Make a List
Make a list of two or three local paver contractors nearby. You will find the contractors online or in the yellow pages. However, also ask for recommendations from friends and local businesses.
2. Check the Reviews
Go online and check their website for reviews. Then, check contact the Better Business Bureau for complaints. Finally, check them out with online review sites such as Angie’s list.
3. Check the Manufacturers
Check the contractor’s recognition by paver manufacturers. Look at the company brochures or websites for the products they install.
4. Ask for a Free Estimate
Call the paver contractor for a free estimate and presentation. While on the phone, was the company representative professional and accommodating?
5. Set Your Budget
Before each meeting, check the contractor website for pricing and paver products they sell. Determine ahead of time what limits are set by your project budget
6. Check for License & Insurance
When they present you with your estimate, be sure to ask questions about the company license and insurance. Also, ask for their ICPI certification. Then, ask for basic design ideas and help. Also, ask about the process they will use to lay the pavers.
7. Check the Estimate Carefully
It is important to check and compare each estimate. It’s also important to check for a price that is reasonable, but not too good to be true. Then, compare estimates to see what specifications each paver contractor lists in their estimate.
8. Compare Your Estimates
Carefully compare all the estimates. Compare the experience with the company rep at the estimate meeting. Decide which company had the best design ideas and the best installation techniques.
9. Signing the Contract
When you select your contractor read over the resulting contract carefully to ensure everything is what you expect. There should be a sketch of the project design and a list of materials along with a complete list of costs. Check and double check before signing the contract
10. Three-day Grace Period
Even after you sign the contract, there is a three-day period for you to change your mind. If something doesn’t seem right, it is better to cancel the contract or ask for changes.
The Proper Way to Install Pavers
It’s good to know a little more about how the pavers are installed before hiring a paver installer so you can check their work. Here’s what you need to know.
⎆ Notify Local Utilities
The project first starts with calls to local utilities to identify gas, electric, and water line locations and mark them. No one wants to hit one of these lines while preparing the base for the pavers. Also, because someone will need access to these lines in the future, ensure that they are well marked. Additionally, a layout must be created by staking and marking the boundaries of the patio with string or paint.
⎆ Clear Debris & Remove Dirt
Clear all vegetation, rocks, and other debris from the area where the installation takes place. Next, they must remove dirt to the correct depth in the whole area to be paved and they need a height just above the surrounding ground level. The depth of the base should equal the thickness of the paver plus six inches. Once they remove the dirt, they will tamp the surface, leaving a flat level bed. At this point, they will lay down a commercial-grade landscape fabric to prevent weeds from growing.
⎆ Complete the Base
Then, they will fill the area with a proper base material. This includes two to four inches of crushed concrete or gravel aggregate. They will then compact and level the area. The next step is to lay conduit poles every two feet and then cover them with screed sand. This is done in sections and must be level. This is the final base for the pavers so it should be firm and level. Then they will add edging around the perimeter and secure it with 8-inch nails.
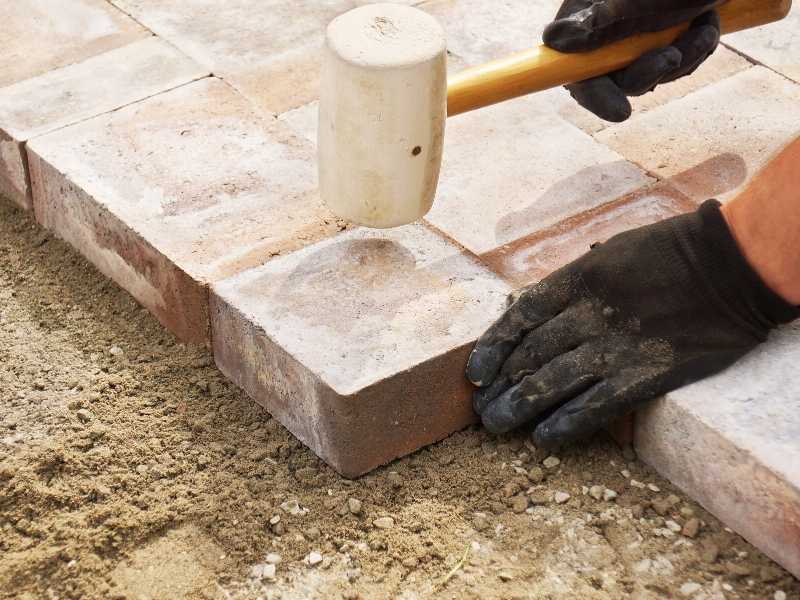
⎆ Install the Pavers
The pavers are installed over the screed sand layer with the rough surface facing upward. The pavers are put in place with the use of a straight edge and level to keep them smooth and square. After that, they tap the pavers in place with a rubber mallet ensuring they are nice and flat. When all the sections of the patio or pathway are completely covered with pavers, masonry sand is spread on top of the surface and a plate compactor or other equipment forces the sand to fill the joints, leaving no empty spaces.
⎆ Sweep and Fill the Gaps
The new surface is then swept with more sand to fill any gaps, and this might need to be repeated several times over a few days as the sand settles. This will ensure a stable, long-lasting paver installation for years of use by you, your family and guests.
Creating A Bathroom That Inspires Tranquility and Calmness
What You Need to Know About Backup Generators for Your Home


