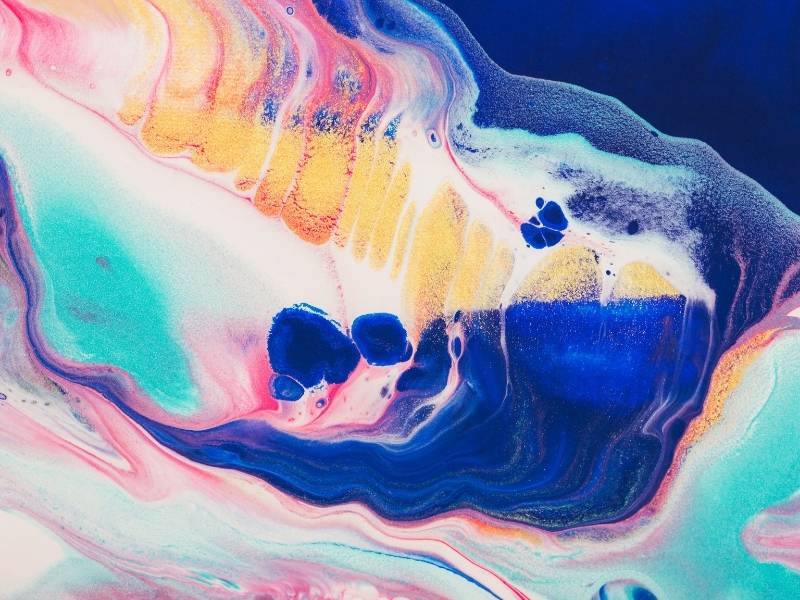
Fluid art is the process of pouring paints on canvas to produce one-of-a-kind artwork. We can all agree that flowing artwork is lovely. In fact, there is something enticing about the beauty found in the smallest details. Today we’re going to show you how to construct an easy DIY fluid art masterpiece that is actually quite simple! Fluid art isn’t only simple to create, but it’s also a lot of fun. It uses a greater amount of liquid paints than standard acrylics. All you need to create fluid art is acrylic medium, acrylic paints, and water.
Fluid-painting.com coloring marker guide can help you further in this regard. Each artist’s fluid painting style is unique. If you’ve just begun acrylic pouring and are still figuring out your own personal style, you’re in the right place. Here are a few examples of pouring techniques to just get you started on your upcoming fluid art masterpiece!
Create Your Own Masterpiece of Fluid Art
Step 1: Set up your workspace and canvases for fluid art.
Drawing your unique fluid art is a lot of fun, but it’s also a lot of work! Take a couple of minutes to arrange your workspace and canvases before you begin to keep all of your drips and pours controlled. To begin, drape a heavy-duty sheet over your work surface or table. This might be a painter’s drop cloth or a doubled-up plastic tablecloth. Ensure your plastic gloves and drinks are nearby as well.
You can wrap it off the backside of the canvas if you want to keep it clean. Finally, you’ll need a technique to lift the canvas off the surface so that the paint can drip. You can use plastic cups just below the canvas or thumbtacks to secure the canvas to the wooden frame on the backside.
Step 2: Paint the edges of the canvas with white paint.
This part is optional; however, I intend the marbled fluid art appearance to stay in the center of the canvas for my works. I begin by pouring white paint across the margins of each canvas to achieve that appearance. You may pour Fluid Art Ready-To-Pour straight from the jar onto the canvas since it is pre-mixed. Grab the canvas and tilt it with your gloves on to allow the paint to drip over the border.
Step 3: Add paint to the cup, then, tilt and pour.
Then, using a plastic cup, layer colorful Fluid Art Ready-to-Pour in layers. I began with Emerald Green, then added Mint Green, Navy, Beige, White, and Sky Blue layers. (Once again, no pouring medium is required. Ready-to-Pour Fluid Art is ready to use right out of the bottle!)
Then just pour the paint over the areas of your canvases that are blank. If you’d like more paint, you can either pour additional layered paint into a cup or spray more drips and lines of paint straight from the container.
Then, wearing gloves, delicately lift the canvas and tilt and turn it gently to enable the paint to flow into the remaining space and drop off the exposed canvas edges. Allow the canvases to dry after you’re satisfied with the covering.
Step 4: Cover with a topcoat.
Lastly, the Clear Pouring Topcoat can be used to give your canvases an extremely glossy, lacquer-like finish. Spread the topcoat across your dry canvases and let it dry. After that, tilt the canvases to ensure even coating and drain any excess product. The topcoat takes at least 24 hours to cure, but once it does, your painting will be shiny and stunning!
⎆ Acrylic pouring techniques.
There are numerous techniques that may be used with fluid art pouring. Experimentation is essential for figuring out the optimal pouring technique for the masterpiece you’re attempting to make. However, there is two popular fluid art pouring methods to use when getting started: the “Straight Pour” and the “Dirty Pour.”
1. Pouring straight.
We recommend this fluid art pouring approach for your first painting. Put a few drops of one color at a time onto the canvas, layering as you go. You can progress to “puddling” with the straight pour once you have a better understanding of how the paint flows. Puddling is a technique that involves pouring puddles of various colors on the canvas and then tilting it at various angles to cover the entire area. You’ll be able to combine your fluid art pouring with other methods for better effects after a few tests.
2. Dirty pour.
This is an acrylic pouring approach in which all of the colors are mixed in the very same cup or jar before being poured onto the canvas. Each color is mixed separately, along with the pouring medium (for example, Liquitex) and water. The proportion is roughly 1:1:1. Two to three droplets of silicone oil per color can be applied to improve cell development.
The color combinations are then piled in a jar on top of one another with maybe just a smidgen of stirring. The jar’s components are then gently poured over the painting surface. The painting ground is shifted back and forth until the paint has spread evenly across the canvas and the result is consistent with the concepts.
3. Flip cup.
The Flip Cup method is similar to Dirty Pouring, except that the paint vessel is placed on the painting surface and pushed up, allowing the separate layers of paint to spread more on top of one another. All of the colors, as well as the pouring medium (such as Liquitex) and water, are blended sparingly. The proportion is roughly 1:1:1. Two to four sprays of silicone oil per color can be applied to improve cell development.
The color combinations are then piled in a container on top of one another. Following that, the container is positioned vertically on the painting surface. After that, the vessel is carefully hauled up.
When more cells are needed, a Bunsen burner or a hot-air dryer can be swiveled over the color. The painting ground is shifted back and forth until the paint has spread evenly across the canvas and the result is consistent with the concepts.
If you haven’t tried creating your own fluid art yet, I hope this article has motivated you to do so. Happy making until next time! If you have any questions or suggestions, we always love to hear from you in the comments below. Also below are links that will take you to more fantastic articles about ALL things DESIGN for your home or business.
Images Courtesy of Canva.
Other Posts You Might Enjoy:
The Benefits of Owning Garden Furniture
Natural Wood Furniture for Your Outdoor Dining
The Essential Guide To Sourcing Furniture Online
3 Reasons Why You Should Invest In Quality Outdoor Furniture


