Dining room tables can be a multi-purpose table in many homes, so you have to take inventory on how you use the space when deciding how to light it. If you will be doing tasks, then you need to have a fixture that will put out ample light to see by. This can be done by a layered lighting design or a fixture that will adjust the light levels to meet both dining and task atmosphere needs. This post is to show you how to light over the dining table lighting ideas.
LAYERED LIGHTING PLAN
Below is an example of a layered lighting design. You can create a layered lighting plan with recessed fixtures containing lamps (bulbs) that have a more intense light output. Decorative fixtures or pendants provide ambient lighting to dine by. I recommend always having dimmer switches as everyone has a different comfort zone when it comes to the level of light. Your decorative fixture or fixtures will be placed in between the recessed fixtures as shown below.
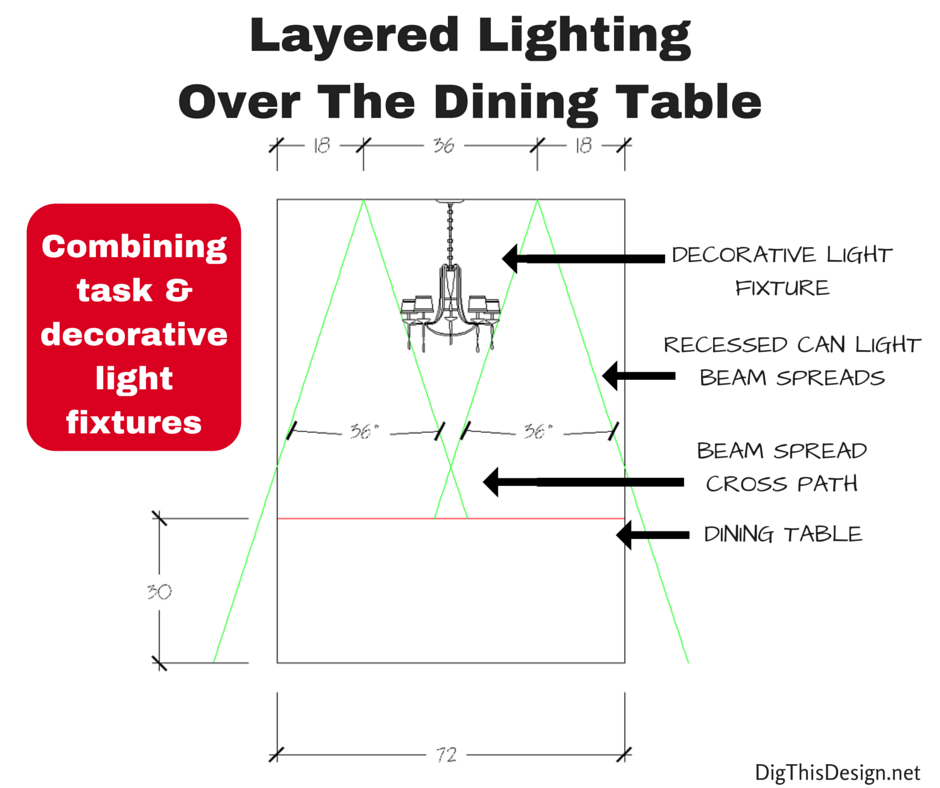
RECESSED LIGHTING
The great thing about recessed fixtures is the lamps that you insert into the fixtures come with beam spread and candlepower specification that are measurable. This will allow you to be able to eliminate shadows, which would work well for tasks or even focal pointing a beautiful material your table may be made out of. To do this, you will need a protractor, scale, and graph paper.
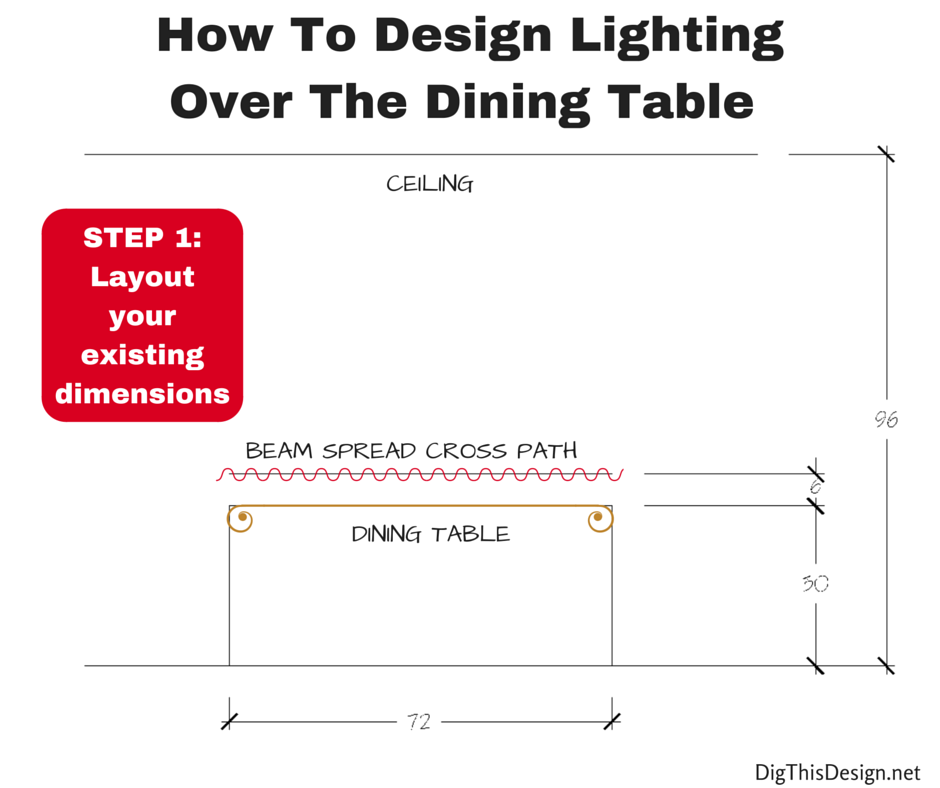
- Take your graph paper and draw a horizontal line that represents your floor.
- If your ceiling height is 8ft. you will make your ceiling line on your graph paper at 8ft with your scale. This will give you a vertical view of your dining room.
- Most dining tables lighting are 30-inches or 2-1/2 ft high so you would want to make another horizontal line showing your table.
- The length of your table will be important so your can measure the light hitting it. Draw a line down from your dining room table top at a 90 degree, to the floor line representing the table end. Measure over the length of your table and repeat.
- Draw another horizontal line 6-inches up from the table top line to dictate where your beam-spread should intersect. You want that intersection to be at least 6-inches from the table surface because that is where most of your activity happens, giving yourself the best lighting and eliminating any shadows.
- Now you are ready to draw your beam spreads to see how they will hit your table top.
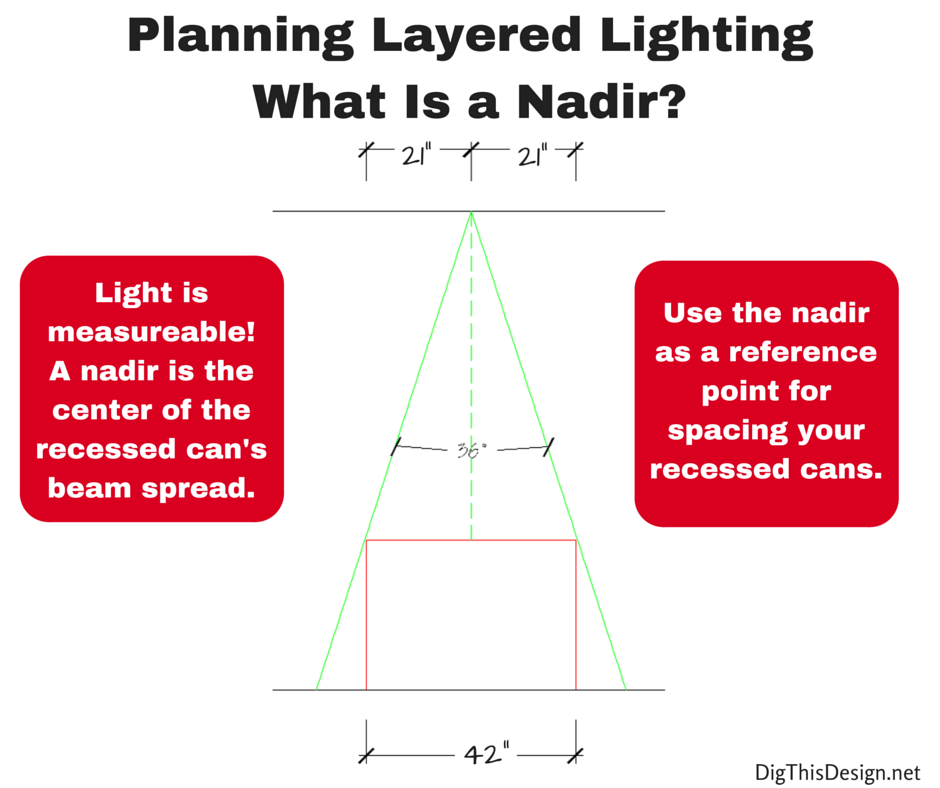
A beam spread will have a center point called the nadir. This is important in order to place your fixture so that you will get the beam spreads hitting your top evenly.
This is the formula you will need to space your recessed fixtures so that the light hits the top evenly:
72″ table divided by 4 = 18 – inches
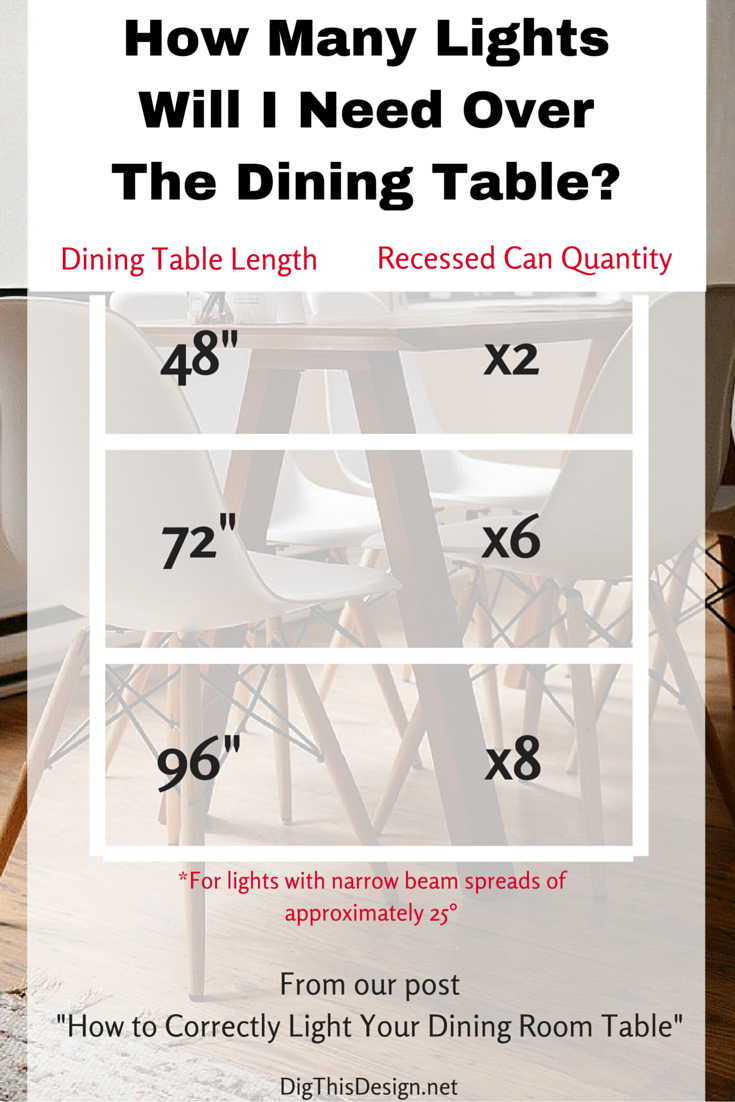
The placement of your first fixture will be at 18″, putting your first fixture centered on half it’s beam, the nadir. The next fixture will be double the 18″, at 36″ spacing. To find out if your fixture’s beam spread is adequate for the space, use your protractor to draw the beam spread coming out from the point used for spacing. The beam spreads should intersect approximately 6″ above the work (or in this case, dining) surface. If they don’t intersect, you will need to get a wider beam spread or add more recessed cans. See the infographic below for common sized dining tables for a quick reference of how many light fixtures will be needed.
Another important detail for lighting coverage to look at is from the end of your table. If your beam spread does not cover the size of your table there will be shadows.
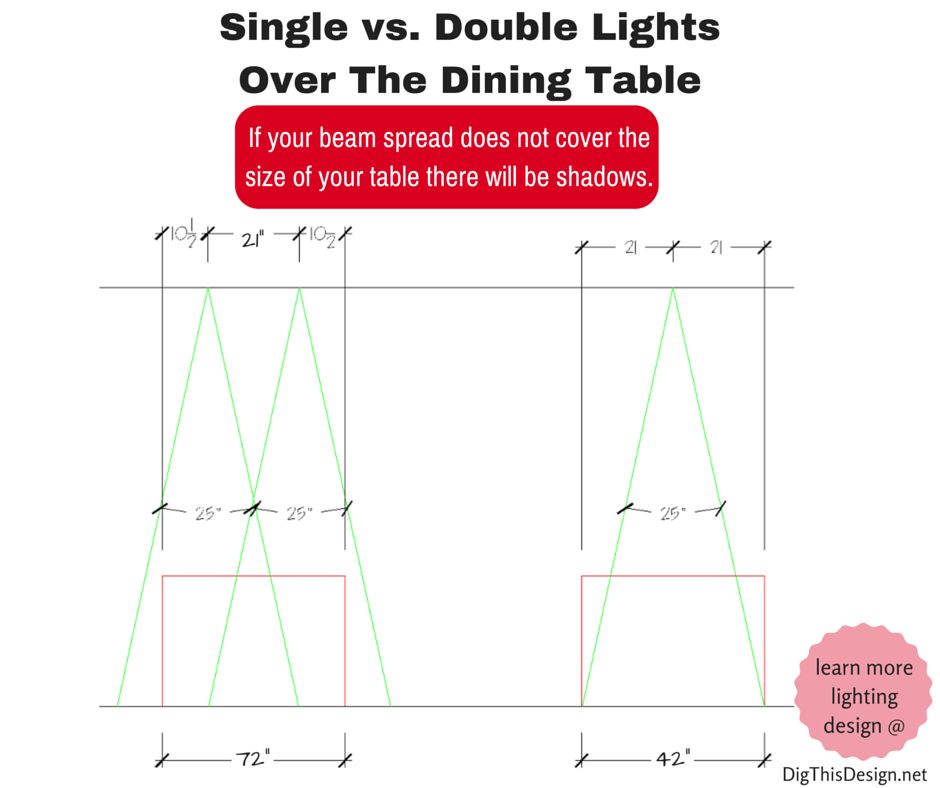
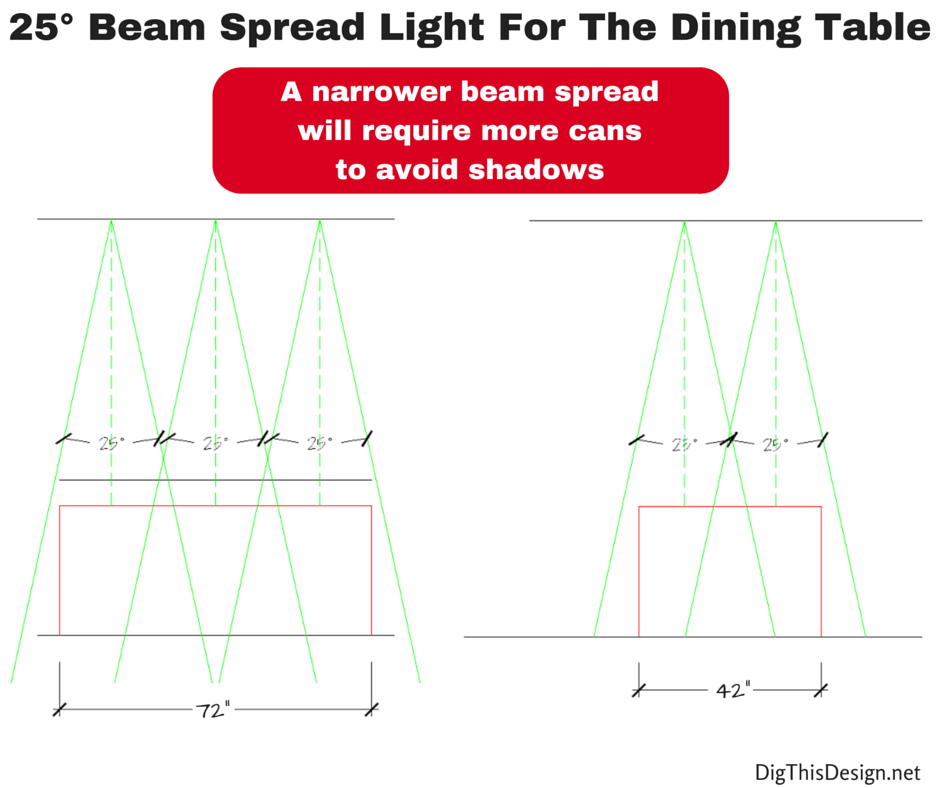
You could use a 25-degree beam spread, but you would need to do it in two rows.
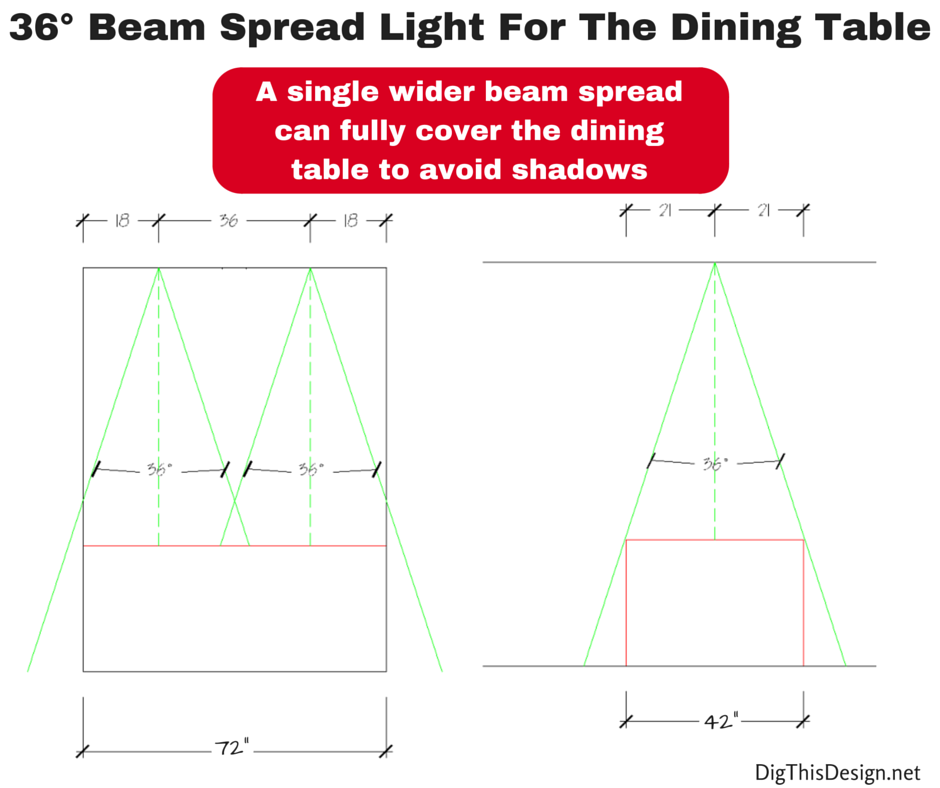
You can see you will need a bigger beam spread for a single row situation. The 36 degree works the best for proper coverage.
DECORATIVE FIXTURES
The shape of your table is important when designing your decorative lighting over your dining room table. If you have a rectangular or an oval table you have some creative options from a single linear fixture to multiple fixtures to compliment your dining table shape.
Round or square tables look great with a chandelier. The diameter of the chandelier will depend on the radius of the table for a balanced design. You do not want to have a chandelier that is too small or too big, it would not look right. A good rule of thumb is for the chandelier’s to be diameter to be 12″ smaller than the table’s width.
The height of the table will range anywhere from 30-inches to 36-inches, depending on the ergonomics of the person. You will also need to take into consideration the design of the fixture and the views of the room from adjacent rooms. For instance, if you want to design the fixture in relationship to a window as seen from the outside, then you will have to take that into consideration.
Lighting is an often underlooked element when designing a room. I hope this post helps you make your dining table lighting ideas with both style and functionality. Check out my other posts on lighting design, or my DIY tips from a pro where I aim to help those embarking on an interior design project on their own.
If design still has you stumped, I’m available for consultation via Skype for your interior design project, no matter the size. Our virtual session will include a document detailing everything discussed. Feel free to contact me prior to setting up a consultation.
Other Posts You Might Enjoy:


